Many people believe that painting plastic fenders is a lost cause—that the paint plastic fenders simply won’t stick or will peel off over time. But here’s the reality: you can paint plastic fenders and with the right preparation and materials, the results can be both durable and professional-looking.
This guide will break down why painting plastic fenders is not only possible but also a smart move if you’re looking to restore or enhance the look of your vehicle.

Why Paint the Plastic Fenders
Plastic fenders might be practical, but they’re not immune to wear and tear. Over time, they face challenges like UV exposure, scratches, fading, and scuffs from everyday use. Leaving them untreated doesn’t just look bad; it can also compromise the material over time.
So, why bother painting plastic fenders? Here are the real reasons:
- Restoration: Let’s start with the obvious. If your fenders are faded, scratched, or discolored, painting them is the easiest way to bring them back to life. You can make them look brand new—or even better if you go for a custom finish.
- Customization: Love the idea of adding a personal touch to your car or motorcycle? Painting gives you complete creative control. Whether you want a glossy red finish, a sleek matte black, or something bold and unique, painting your fenders is your chance to showcase your style.
- Protection: Paint isn’t just for looks; it also acts as a barrier. High-quality paints and clear coats protect your plastic fenders from UV rays, moisture, and dirt, which can all degrade the material over time.
- Cost-Effective: Compared to replacing fenders or hiring a professional, a DIY paint job is affordable. All you need is the right tools, paints, and a bit of patience.

Understanding the Basics of Painting Plastic Fenders
Painting plastic isn’t the same as painting other materials like metal or wood. Plastic has its quirks, and understanding them is the key to a successful paint job. Here’s what you need to know:
Patience is Key for painting the plastic fenders
Painting plastic isn’t a one-and-done deal. It involves multiple steps—cleaning, sanding, priming, painting, and sealing. Each step requires drying time for the best results. Rushing through any part can compromise the finish and durability
Paint Adherence
Plastic doesn’t naturally allow paint to stick. That’s because many plastic fenders have a slightly oily surface due to mold-release agents used in their manufacturing. Without proper cleaning and prepping, your paint might bubble or peel off. This is where sanding and primers come into play.
Flexibility Matters in paint the plastic fenders
Unlike metal, plastic fenders can bend or flex, especially during installation or under road conditions. Using standard paints might lead to cracks. You’ll need flexible, automotive-grade paints and primers specifically designed to handle this movement.
Importance of Surface Preparation
Surface prep is non-negotiable. Cleaning the fender thoroughly removes grease, dirt, and residues. Sanding the surface not only removes imperfections but also creates a rough texture for the primer and paint to adhere to. Think of it as the foundation for your paint job.

Use the Right Products for paint the plastic fenders
Not all paints and primers are created equal. For plastic fenders, you need products labeled as “plastic-friendly” or “automotive-grade.” These are formulated to bond well with the surface and withstand environmental conditions like heat, moisture, and UV exposure.
Tools and Materials You’ll Need
Before you start painting, you need the right tools and materials. Investing in quality products will save you a lot of frustration and ensure the best results.
A drop cloth or old newspapers to catch any overspray.
Cleaning Supplies
A degreaser or plastic cleaner is essential for removing grease, dirt, and residues. Skipping this step can cause paint to bubble or peel.
Use a clean cloth or microfiber towel to avoid scratching the surface.

Sandpaper
Get sandpaper in varying grits (e.g., 320 and 600).
Use coarse grit to remove old paint or imperfections and fine grit for smoothing the surface.

Adhesion Promoter or Plastic Primer
An adhesion promoter is a lifesaver for ensuring your paint bonds to the plastic.
Look for primers labeled as “plastic-friendly” or “automotive-grade.”
Paint
Use spray paint specifically designed for plastic surfaces.
Choose a high-quality brand for long-lasting color and durability.

Clear Coat
A clear coat adds shine and protects the paint from UV rays and scratches.
Go for a clear coat compatible with your paint type.
Additional Tools for painting plastic fenders
Masking tape to protect areas you don’t want to paint.

Why Each Tool and Material Matters
Cleaning supplies ensure the surface is free of any contaminants that could interfere with the paint. Sandpaper roughens up the surface so the primer and paint can adhere better. The adhesion promoter acts like glue between the plastic and the primer, and the primer provides a solid base for the paint to stick to. The paint and clear coat finish the job, giving your fenders both style and protection.
Using the wrong tools or skipping steps can ruin the entire process. Imagine spending hours painting only to see it chip away after a few weeks. That’s why every tool and material plays a critical role in getting that perfect finish.
Step-by-Step Guide to Painting Plastic Fenders
Many people think that prepping plastic fenders for painting is a tedious, unnecessary chore. Some might even believe you can skip straight to painting if the fender looks clean. That’s a big mistake!
Proper preparation isn’t just important; it’s the foundation of a long-lasting, professional finish. Let’s dive into the exact steps that ensure your paint sticks, looks great, and stays put for years.
Step 1: Cleaning the Plastic Fenders
The first step in prepping your fenders is cleaning them thoroughly. Plastic fenders often have traces of dirt, grease, and manufacturing residues like mold-release agents. These contaminants can interfere with the adhesion of paint, leading to bubbling or peeling.
Start by washing the fenders with soap and water to remove surface-level grime. Follow up with a degreaser or a plastic cleaner to eliminate any oils. Be meticulous—get into the corners and edges where dirt tends to hide. After cleaning, let the fenders dry completely.

Step 2: Sanding for Better Paint Adhesion
Sanding might sound like extra work, but it’s non-negotiable if you want your paint to stick properly. Sanding creates a slightly rough surface that gives the primer and paint something to grip onto.

- Use Medium-Grit Sandpaper (320-400): Start with medium-grit sandpaper to remove the shine from the fender’s surface and any imperfections.
- Switch to Fine-Grit Sandpaper (600): Once the surface is dull and smooth, switch to finer sandpaper to refine the texture and remove any visible scratches.
- Clean Again: After sanding, wipe the surface with a clean, damp cloth to remove dust particles.
Step 3: Applying Adhesion Promoter
Plastic fenders need an adhesion promoter to help the primer and paint bond effectively. This step is often overlooked, but it makes a massive difference in the durability of the paint job.
Apply a thin, even layer of adhesion promoter to the sanded fender. Follow the product’s instructions for drying time before moving on to the next step. Skipping this step can result in a paint job that peels or chips easily, especially on flexible surfaces like plastic.
Priming and Painting Plastic Fenders
Now that your fenders are prepped, it’s time to move on to the exciting part—priming and painting!
Step 4: Applying Primer
The primer is the base coat that prepares the surface for paint. It fills in tiny imperfections left by sanding and creates a smooth, uniform surface.
- Choose the Right Primer: Make sure your primer is specifically designed for plastic and labeled as “automotive-grade.”
- Apply in Thin Layers: Hold the spray can about 8-10 inches away and apply the primer in light, even coats. Avoid heavy layers that can drip or run.
- Drying Time: Allow the primer to dry completely between coats (typically 10-15 minutes) and after the final coat (about 30 minutes to an hour).
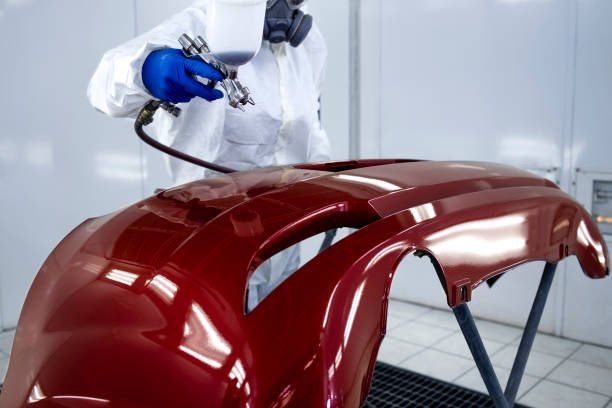
Step 5: Painting the Fenders
Painting is where the transformation happens. This is your chance to bring your fenders back to life or give them a completely new look.
- Shake It Up: Shake the spray paint can thoroughly to mix the paint evenly.
- Apply Multiple Light Coats: Instead of one heavy coat, apply 2-3 thin coats, letting each layer dry for 10-15 minutes. This prevents drips and ensures an even finish.
- Watch for Coverage: Cover the entire surface evenly, but don’t rush. Take your time to get into corners and edges without over-spraying.
- Dry Completely: After the final coat, let the paint cure for at least 24 hours before handling.
Step 6: Finishing with a Clear Coat
A clear coat isn’t just about shine—it’s a protective barrier that keeps your paint job safe from scratches, UV damage, and moisture.
Allow Proper Drying: Let the clear coat dry between layers and cure fully for 48 hours before exposing the fenders to the elements.
Apply Thin, Even Layers: Like with the primer and paint, use multiple thin layers for the clear coat.

Maintaining Painted Plastic Fenders
Now that your plastic fenders are painted and sealed, keeping them in tip-top shape is the next step. A little maintenance goes a long way in preserving that shiny, flawless finish.
Regular Cleaning
Dirt and grime can build up quickly, especially on fenders. Here’s how to clean them without damaging the paint:
- Use Mild Soapy Water
- Avoid harsh detergents that can strip the sealant.
- Mix a gentle car wash soap with water for a safe cleaning solution.
- Soft Cloth or Sponge
- Use a microfiber cloth or soft sponge to avoid scratching the surface.
- Avoid abrasive scrubbers or brushes.
- Rinse and Dry Thoroughly
- After washing, rinse the fenders with clean water to remove soap residue.
- Dry them with a soft towel to prevent water spots.
Waxing for Extra Shine and Protection
Waxing isn’t just for your car’s body—it works wonders on plastic fenders too. A good wax adds another layer of protection and enhances the paint’s shine.
- Choose a High-Quality Wax: Look for waxes safe for automotive plastic.
- Apply in Small Sections: Use a soft cloth to apply the wax in circular motions.
- Buff for Shine: Once the wax dries to a haze, buff it with a clean microfiber cloth for a polished finish.
Avoiding Common Pitfalls
Watch for Chips: Address any chips or scratches immediately to prevent further damage.
Don’t Use Harsh Chemicals: Products like ammonia-based cleaners can strip the sealant.
Skip Automatic Car Washes: The heavy brushes in automated car washes can scratch or damage the paint.
FAQs About Paint Plastic Fenders
1. Can you paint plastic fenders without sanding them first?
Not sanding your plastic fenders is a common mistake. Sanding creates a rough surface that helps the primer and paint adhere properly. Without it, the paint is likely to peel or chip off quickly.
2. Do I need a special type of paint for the plastic fenders?
Yes, you should use paint specifically designed for plastic surfaces. Automotive-grade spray paints or paints labeled as suitable for plastic are the best options.
3. How many coats of primer and paint should I apply?
For the best results, apply 2-3 thin coats of primer and an equal number of paint layers. Allow each coat to dry completely before applying the next one.
4. How long should I wait before sealing painted plastic fenders?
After applying the final coat of paint, wait at least 24 hours before sealing. This ensures the paint has fully dried and cured, giving the sealant a stable surface to adhere to.
5. Is a clear coat necessary for painted plastic fenders?
Absolutely! A clear coat acts as a protective layer, preventing scratches, UV da