Ever struggled to tie rope boat fenders securely, only to have them slip, tangle, or just not stay in place? You’re not alone! Many boaters face this frustrating problem, and let’s be honest—who wants to spend time fumbling with knots when you could be enjoying the water? The key to mastering how to tie rope boat fenders in 7 easy steps is using high-quality marine-grade nylon ropes that provide strength, durability, and resistance to harsh marine conditions.
In this guide, I’ll walk you through seven simple steps to tie your boat fenders like a pro. No complicated knots, no stress—just an easy, effective method that works every time. Whether you’re a beginner or an experienced boater, these steps will ensure your fenders stay secure and do their job perfectly.
Step-by-Step Process to Tie your Boat Fenders Securely
Follow these simple steps to tie your boat fenders securely and keep your boat protected.
1. Gather the Right Tools and Materials
Before you start, you’ll need the right tools and materials to ensure your fenders stay in place, no matter the conditions. Here’s what you’ll need:
Essential Items:
- Boat fenders – These act as a protective barrier between your boat and docks or other boats.
- Sturdy rope – Opt for marine-grade nylon rope (usually 3/8-inch thick) because it’s strong, durable, and resistant to wear and tear.
- Attachment point – This could be a cleat, rail, or stanchion on your boat where you’ll secure the rope.
Need a Reliable Rope? Secure your boat fenders with durable, marine-grade nylon ropes built to withstand harsh waters. Check out top-rated options on Amazon 👉 Shop Now
Why These Materials Matter:
- Nylon rope is the best choice because it’s flexible, UV-resistant, and can handle rough waters without breaking or fraying.
- Using the right fender size is important; if they’re too small, they won’t protect your boat, and if they’re too large, they can be bulky and difficult to manage.
- Choosing the correct attachment point ensures your fenders stay in the optimal position without constantly shifting.
Pro Tip:
- Avoid using cheap, thin ropes—they might save you money upfront, but they can weaken over time and cause fenders to slip or break free.
- Consider UV-resistant ropes to extend their lifespan, especially if your boat is frequently exposed to the sun.
With the right gear in hand, you’re ready to move on to the next crucial step—choosing the perfect placement for your fenders.
2. Choose the Perfect Fender Placement
Now that you have your tools ready, it’s time to position your fenders correctly. This is crucial because improper placement can leave parts of your boat unprotected.
Where Should You Place Boat Fenders?
- The best spots are the widest points of your boat where it will make contact with docks or other boats.
- If docking solo, position fenders where they’ll take the most impact when you approach the dock.
- For raft-ups (tying up to another boat), ensure fenders are between both boats to prevent hull damage.
Got a pontoon boat? 🛥️ Learn the best way to tie fenders specifically for pontoons in this detailed guide: How to Tie Fenders to a Pontoon Boat
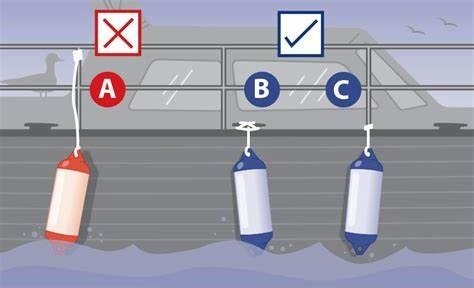
Adjusting Fender Height for Maximum Protection
- Your fenders should hang so they’re just above the waterline, preventing them from getting wet and dirty.
- When docking at floating docks, adjust fenders slightly lower as the dock moves with the water.
- If you’re docking next to a taller or shorter dock, reposition fenders so they align with the height difference.
Pro Tip:
- Check fender height before leaving the dock. A quick test can prevent unnecessary readjustments later.
- Keep extra fenders onboard—different docks require different placements.
With the right placement set, it’s time to move on to creating a simple, effective loop that keeps everything in place!
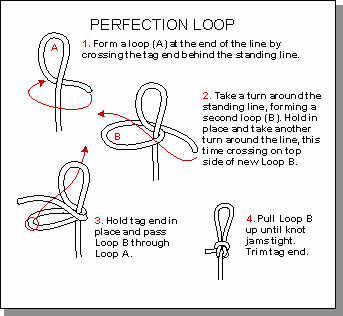
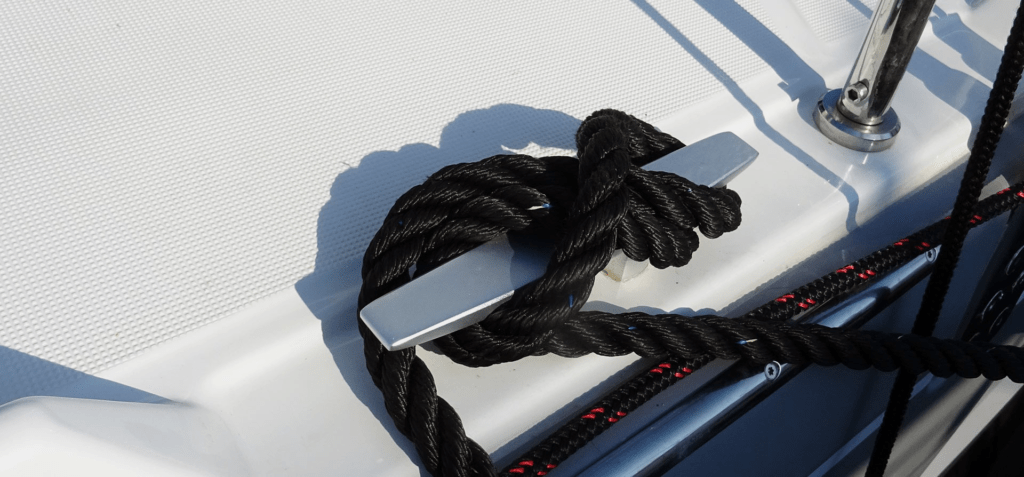
3. Create a Simple Loop in the Rope
Tying complicated knots isn’t necessary when setting up boat fenders. A simple loop makes the entire process easier and allows for quick adjustments when needed.
How to Make a Simple Loop in the Rope
- Fold the rope in half to create a loop at one end.
- Pinch the folded end together to keep the loop shape.
- Leave enough length so the loop can wrap around the cleat or rail securely.
Why This Method Works So Well
- No knots needed – This keeps things simple and avoids complicated untangling.
- Quick adjustments – Easily shorten or lengthen the rope by sliding the loop.
- Better durability – No excessive tension means less rope fraying over time.
Pro Tip:
- If your fenders keep shifting, use a double loop for added grip and security.
- Make sure your loop is large enough to fit over different boat cleats or rails.
Now that you’ve got your loop ready, it’s time to secure it properly to your boat.
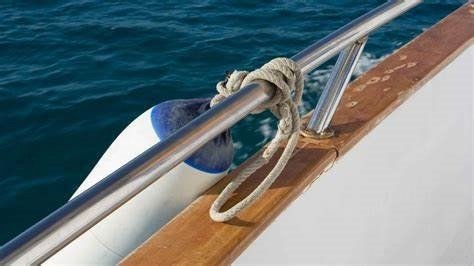
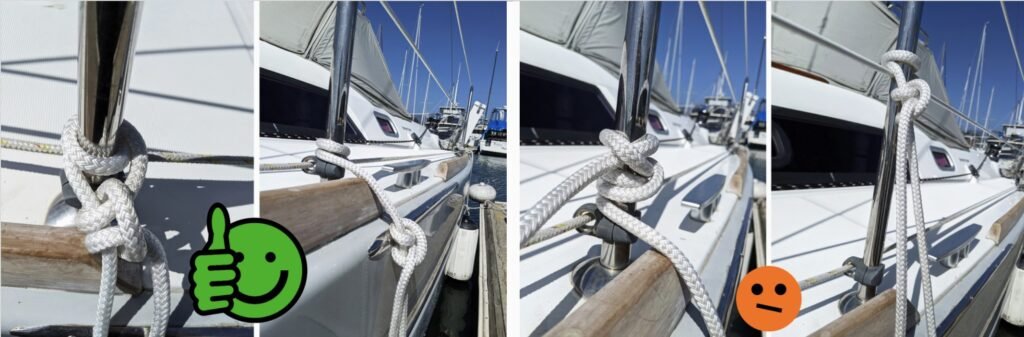
4. Secure the Loop to the Cleat or Rail
Attaching your loop to a cleat or rail is the final step in ensuring your fenders stay in place, even in rough waters.
How to Attach the Loop to a Cleat or Rail
- Hook the loop over the cleat or rail on your boat.
- Pull the loose ends through the loop to tighten the grip.
- Adjust as needed to ensure the fender hangs at the correct height.
Why This Method is Foolproof
- Prevents slippage – The loop cinches tight when pulled, keeping the fender in place.
- Fast setup – You don’t need to tie complex knots every time you dock.
- Easy to remove – Just loosen the loop and slide it off.
Think of it Like Tying a Shoelace
Imagine how you tie your shoelaces: you create a loop, pull the lace through, and tighten it. This is the same idea but even simpler!
Pro Tip:
- If you’re in choppy waters, add a second loop for extra security.
- Regularly check your fender ropes—they can loosen over time, especially in rough conditions.
Now that your fender is securely attached, the next step is adjusting the rope length for a perfect fit—stay tuned for that in the next section!
5. Adjust the Rope Length for the Perfect Fit
Now that your fender is attached, it’s time to get the rope length just right. This step is crucial because if your fenders are too low, they’ll drag in the water and wear out quickly. Too high, and they won’t protect your boat properly.
Why Rope Length Matters
Getting the right fender height ensures your boat stays protected from docks, pilings, and other boats. A poorly adjusted fender can lead to scratches, dents, or worse—costly repairs.
How to Adjust the Rope Length
- Start with a Test Position – Before tightening everything, position the fender just above the waterline. This is usually the safest height.
- Pull the Rope Gently – Slowly adjust the rope by pulling it up or loosening it until the fender sits in the perfect spot.
- Check the Dock Height – If you’re docking at different locations, adjust the fender height accordingly.
- Secure the Rope Firmly – Once you’re happy with the position, ensure the rope is tight so it won’t slip or shift.
Pro Tip:
If you’re docking in a place with strong waves or tidal changes, consider leaving a bit of extra slack to allow for movement.
6. Double-Check for Security
Before you call it a day, double-check that your fenders are firmly in place. A loose fender can be useless if it shifts or falls off when you need it most.
Why Security Matters
Imagine cruising into a dock and suddenly realizing your fender has slipped—your boat could end up with unnecessary scratches or damage. Taking a few seconds to double-check can save you from expensive repairs.
How to Ensure Your Fenders Are Secure
- Give It a Gentle Tug – Lightly pull on the rope to make sure it’s firmly in place.
- Check for Movement – If the fender moves easily, tighten the loop or adjust the placement.
- Consider a Backup Loop – For extra security, create a second loop around the cleat or rail.
- Look for Wear and Tear – If your rope is frayed or the fender is damaged, replace them immediately.
Bonus Tip:
If you’re expecting rough waters, adding an extra loop or using a fender clip can provide additional peace of mind.
With these steps, your fenders will stay exactly where they need to be, keeping your boat safe and protected. Now, you’re almost ready to hit the water without any worries!
7. Test and Fine-Tune
Before you head out on the water, it’s time for one final check. Testing your boat fender placement ensures they’ll do their job when needed. A quick adjustment now can save you from dealing with scratches, scuffs, or worse—structural damage to your boat.
Why Testing Matters
Even if everything looks secure, a simple bump test will show whether your fenders are in the right position. Different docks and boats require slight adjustments, so it’s always a good idea to fine-tune them before setting off.
How to Test Your Fender Setup
- Gently Nudge the Dock – Move your boat slightly toward the dock to see if the fenders absorb the impact correctly.
- Observe Fender Movement – If the fenders shift too much or aren’t absorbing the impact, adjust the rope length or placement.
- Check for Coverage – Make sure your fenders are protecting the widest and most vulnerable parts of your boat.
- Simulate Different Conditions – Slightly rock the boat to see how the fenders respond to motion and adjust accordingly.
Final Adjustments
- If the fenders drag too low, tighten the rope slightly.
- If they’re sitting too high, loosen the rope to drop them lower.
- If they shift too much, add a second loop or secure them with a fender clip.
By doing this final check, you’ll have peace of mind knowing your fenders are in the perfect position to protect your boat from unexpected bumps.
Still unsure about securing your boat fenders? Watch this quick step-by-step video tutorial to see the process in action:
Conclusion
Tying your boat fenders securely doesn’t have to be complicated. By following these simple steps, you can make sure your boat stays protected from dings, scratches, and damage—without dealing with frustrating knots. Whether you’re a beginner or an experienced boater, these techniques will save you time and effort.
Now that you know how to tie fenders like a pro, you can dock with confidence, knowing your boat is safe and secure. Just remember to check your fenders regularly and adjust as needed for the best protection.
Frequently Asked Questions (FAQs)
1. What’s the best rope for tying boat fenders?
The best rope for boat fenders is nylon. It’s strong, flexible, and resistant to water and UV damage. Plus, it has a slight stretch, which helps absorb shock when docking.
2. How many fenders should I use for my boat?
It depends on the size of your boat, but a good rule of thumb is at least one fender for every 10 feet of boat length. If you’re in a crowded marina, adding extra fenders is always a good idea.
3. How high should I hang my boat fenders?
The ideal height is just above the waterline, but this can vary based on the dock or other boats. Adjust as needed to make sure your fenders are in the right spot to prevent damage.
4. Can I reuse the same rope for different fenders?
Yes! If your rope is in good condition, you can reuse it. Just check for signs of wear and tear, like fraying or weakening, before using it again.
5. How do I stop my fenders from slipping or coming loose?
Make sure to use the loop-and-pull method and double-check that your rope is tight. If you’re in rough waters, adding a second loop for extra security is a smart move.
6. What’s the easiest way to remove fenders quickly?
Using a quick-release knot or a looped attachment makes it super easy to remove and adjust your fenders in seconds.