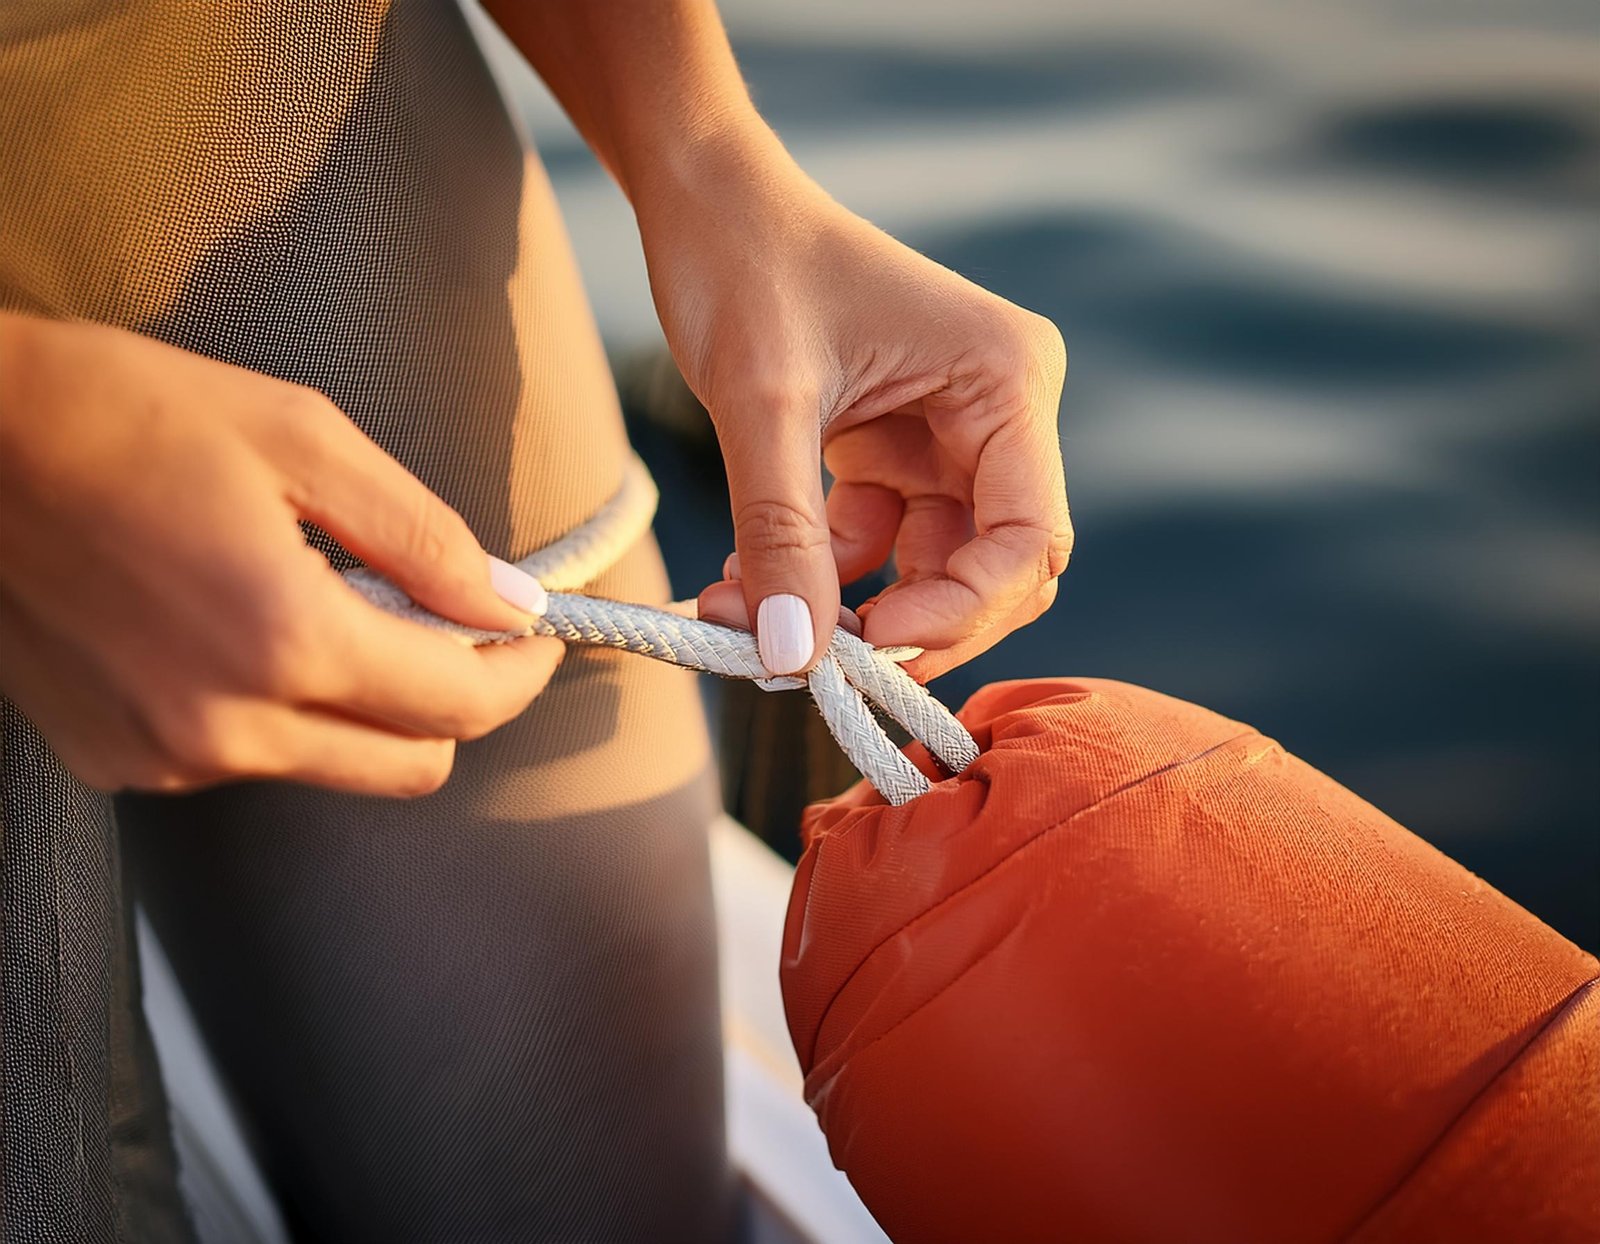
Imagine this: You’ve had an amazing day out on the water. The sun is setting, and you’re ready to dock your boat. But there’s a slight problem—if you don’t tie your fenders correctly, your boat could end up with some nasty scratches or worse. So, what’s the big deal with fenders, and why should you care about how they’re tied?Knowing how to tie fenders to a boat properly can save you from costly damages and ensure a smooth docking experience.
Let’s dive in and talk about why tying fenders correctly is crucial and what you need to do before you even start tying those knots.

Fenders are those unsung heroes that keep your boat safe from bumps and scrapes when it’s tied up. They act like cushions between your boat and the dock (or other boats), absorbing the shock and preventing damage. But here’s the thing: if you don’t choose the right fenders or tie them properly, they won’t do their job effectively.
Why Fenders Matter More Than You Think
Fenders are like the seat belts of boating. Just like you wouldn’t drive without buckling up, you shouldn’t dock your boat without making sure the fenders are in place and secured correctly. They protect your boat from everyday wear and tear, especially in challenging conditions like wind, waves, or a busy marina.
In this article, we’re going to cover everything you need to know to make sure your fenders are doing their job. We’ll talk about how to choose the right fenders for your boat, how to tie fenders to a boat, the essential knots you need to know, and how to place your fenders for different boating situations. By the end, you’ll feel confident that your boat is well-protected, regardless of your docking situation.
Quick Solution: Master the Basics of Fender Tying
If you want to avoid the stress of potential damage, it’s crucial to know how to tie your fenders correctly. This isn’t just about throwing them overboard and hoping for the best. There’s a technique to it and getting it right can make all the difference.
We’ll cover everything you need to know—from choosing the right fenders to mastering the essential knots. But first, let’s start with the basics.
Choosing the Right Fenders for Your Boat
Selecting the correct fenders is essential to safeguarding your boat against damage during docking or mooring
Protect Your Boat with the Right Fenders
Let’s start with the basics: What exactly are fenders, and why are they so important for your boat? Fenders are cushioned barriers that hang over the side of your boat during docking. They act as buffers, preventing bumps, scratches, and other damage when your boat contacts a dock, pier, or another boat.
But here’s the catch—However, it’s important to note that just like you wouldn’t wear shoes that don’t fit, you shouldn’t use fenders that aren’t right for your boat. Selecting the right fenders is crucial for maintaining your boat’s condition.
Curious if your fenders are doing their job? Discover whether boat fenders float and why it matters for your safety!
What to Consider When Choosing Fenders
Not all fenders are the same, and several factors should be considered when choosing the right ones for your boat
- Boat Size and Type: The size of your boat directly affects the size and number of fenders you’ll need. For example, a small fishing boat will require smaller fenders than a large yacht. The type of boat—whether it’s a sailboat, motorboat, or pontoon—also matters, as different boats have different shapes and docking needs.
- Dock Conditions: Where you typically dock your boat plays a huge role in selecting fenders. Consider the height and material of the dock. A high dock might require you to adjust the height of your fenders, while a rough, wooden dock could need thicker fenders to avoid scratches.
- Weather and Water Conditions: If you’re often docking in areas with rough waters or strong winds, you’ll want more durable and possibly larger fenders to handle the extra stress. Calm, protected waters might allow for smaller or fewer fenders.
Exploring Common Fender Types
With these factors in mind, let’s explore the different types of fenders available.
- Cylindrical fenders are the most common type and work well in various situations. They can be hung vertically or horizontally, depending on your docking needs.
- Round fenders are often used for larger boats. Their shape provides excellent protection against docks and piers, especially in rough conditions.
- Ladder & Steps Fenders are designed to protect your boat and offer an additional function as a step, making it easier to climb aboard.
- Thru-hole fenders are unique as they have a hole running through the middle, allowing them to be easily secured with a rope. They are great for quick, temporary setups.
- Bow and stern fenders are designed specifically for the front (bow) and back (stern) of the boat, providing protection where it’s most needed.
- Ring fenders are typically used for very specific docking situations. They are round with a hole in the center, making them easy to attach securely.
- Cushion and flat fenders are ideal for tight spaces. They offer excellent protection without taking up too much room.
- Dock fenders and accessories are installed directly onto the dock, providing a stable, permanent solution to protect your boat every time you dock.
- Pile fenders are designed to wrap around pilings. They provide protection when docking alongside a pier with large posts or pilings. These fenders are especially useful in areas with strong currents where your boat might frequently bump against a piling.

Learning the Key Knots to Tying Fenders
Knowing the right knots can make all the difference in keeping your boat safe and secure. Let’s dive into these essential techniques that every boater should master
Use These Crucial Knots to Keep Your Fenders Secure.
Now you have right fenders for your boat, let’s move towards tying knots:
By tying your fenders with the correct knots, you can ensure they stay in place, no matter what the conditions are like.
Moreover, it’s easier than you might think—once you learn these essential knots, you’ll be ready to handle any docking situation with confidence.
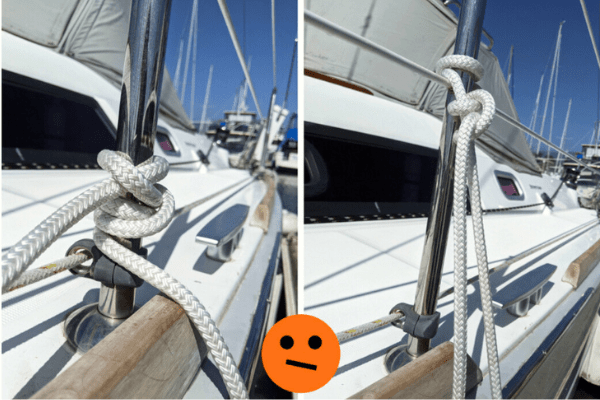
The Cleat Hitch Knot for Quick and Adjustable Tie:
Why It’s Great: The cleat hitch is the knot you’ll use most often. It’s quick to tie, easy to adjust, and holds up well under pressure. This makes it perfect for general docking situations where you need reliability without the fuss.
How to Tie It:
- Step 1: Wrap the line around the base of the cleat.
- Step 2: Cross the line over the top, forming an “X.”
- Step 3: Tuck the end under one of the arms of the “X” to create a half hitch.
- Step 4: Pull tight to secure the knot.
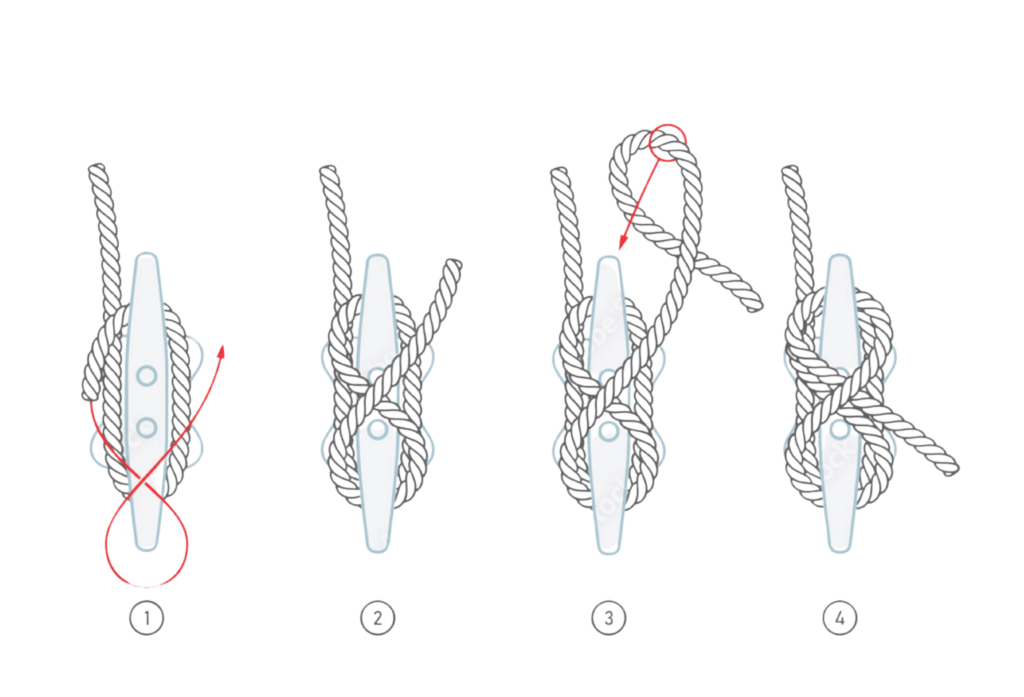
Tips: If your fender slips, try tightening the knot and ensuring the line is snug before crossing it over. This little trick can save your boat from some nasty scratches!
Round Turn and Two Half Hitches for Providing Additional Protection:
Why It’s Great: When conditions get rough, the round turn and two half hitches knot is your best friend. It provides a strong hold, giving you that extra security when you need it most.
How to Tie It:
- Step 1: Wrap the line around the cleat or rail twice, making a full circle.
- Step 2: Pass the end of the line over itself and tuck it under to create the first half hitch.
- Step 3: Repeat the process to make a second half hitch.
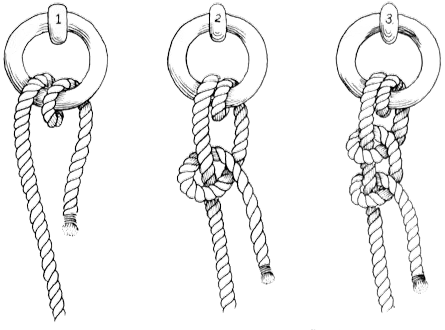
Tips: For maximum security, always wrap the line twice around the cleat or rail before tying the hitches. This ensures the knot stays tight, even in strong currents.
Bowline for Creating a Secure Loop:
Why It’s Great: The bowline knot is fantastic when you need to create a fixed loop at the end of your rope. It’s especially useful for securing fenders to rails or other structures. Plus, it won’t slip, no matter how much tension is on the line.
How to Tie It:
- Step 1: Make a small loop in the line, leaving a long end for the loop.
- Step 2: Pass the end of the line through the loop from the underside.
- Step 3: Wrap the end around the standing part and back through the loop.
- Step 4: Pull tight to form a secure loop
.
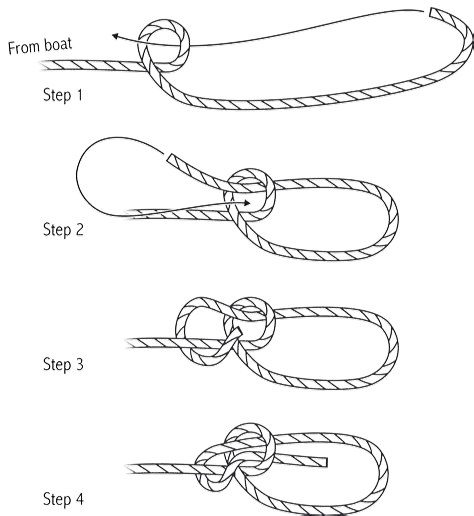
Tips: The bowline knot is perfect for situations where you need a reliable loop, especially when tying fenders to something other than a cleat.
Clove Hitch for Easy and Quick Fixes:
Why It’s Great: The clove hitch is your go-to for quick fixes. It’s super easy to tie and works well for temporary situations, like when you need to tie a fender to a railing in a hurry.
How to Tie It:
- Step 1: Wrap the line around the railing twice.
- Step 2: Tuck the end under the line to secure it.
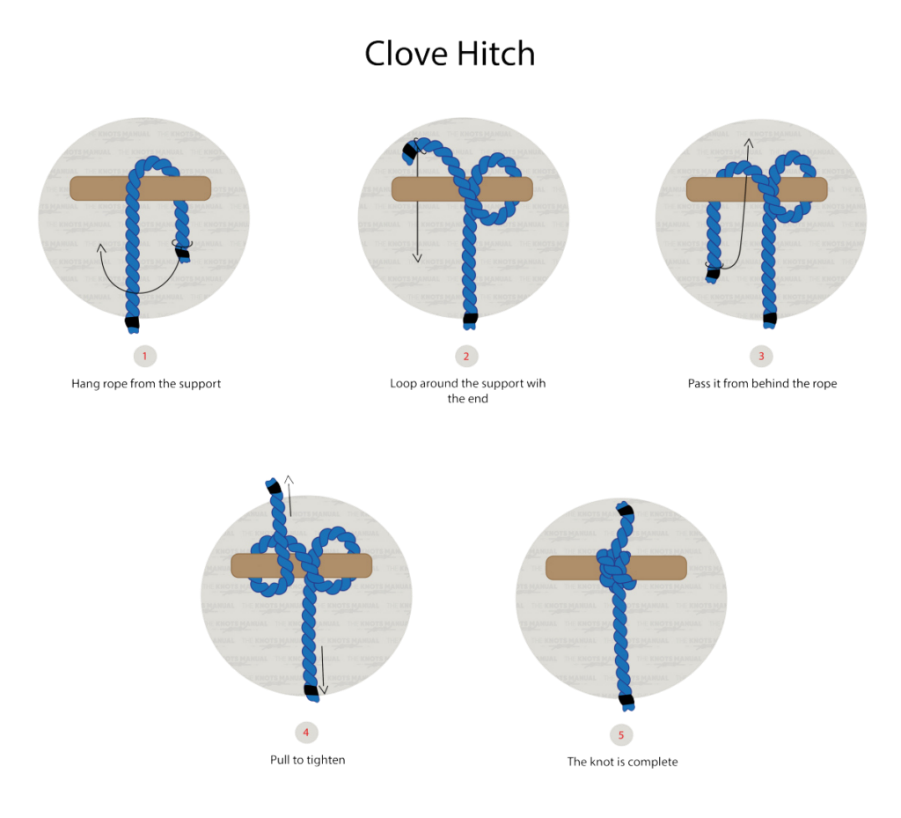
Tips: While the clove hitch is great for quick fixes, remember it’s not as secure as other knots. Use it when you need a temporary solution, and always check that the fender stays in place.
It Depends on Which Knot Is Right!
So, which knot should you use? Ultimately, it depends on your situation.
For general use, the cleat hitch is your best bet. However, if you need more security, go for the round turn and two half hitches.
On the other hand, if you’re in a pinch, the clove hitch can save the day. Having a few knots in your arsenal ensures you’re prepared for any docking scenario.
Struggling with Docking Issues? Learn the Way to Secure Fenders.
Now that you have the proper fenders and know how to tie essential knots, it’s time to put that knowledge into practice.
Different docking situations require different techniques to tying and positioning your fenders. Whether you’re docking, rafting up, or anchoring, each situation requires a different strategy to tying and positioning your fenders.
Imagine docking your boat in a storm without properly secured fenders. The waves push your boat against the dock, causing scratches and dents. Now picture the same scenario, but with fenders placed correctly and secured with a cleat hitch. Your boat remains safe, avoiding costly repairs.
When Docking Your Boat, Proper Positioning Is Crucial
When docking beside a pier, proper fender placement is critical. The goal is to ensure that your fenders are positioned where your boat will most likely make contact with the dock..
Here’s what you need to do:
- Spacing is key: Start by hanging your fenders equally along the sides of your boat. A good rule of thumb is to place a fender every 6-8 feet. If your boat is longer, you might need more fenders.
- Adjust the Height: Your fenders should be the same height as the dock. If the dock is high, hang your fenders lower to protect the point of contact. For low docks, raise the fenders accordingly.
- Secure the Fenders: To secure your fenders to the boat, use the cleat hitch or round turn and two half hitches. Make sure they are snug but not too tight—you want them to stay in place, but also absorb any impact.
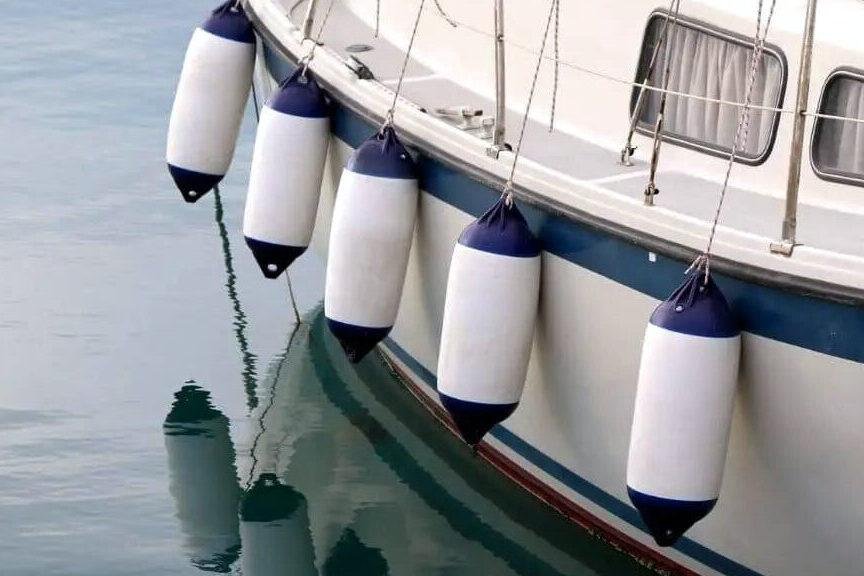
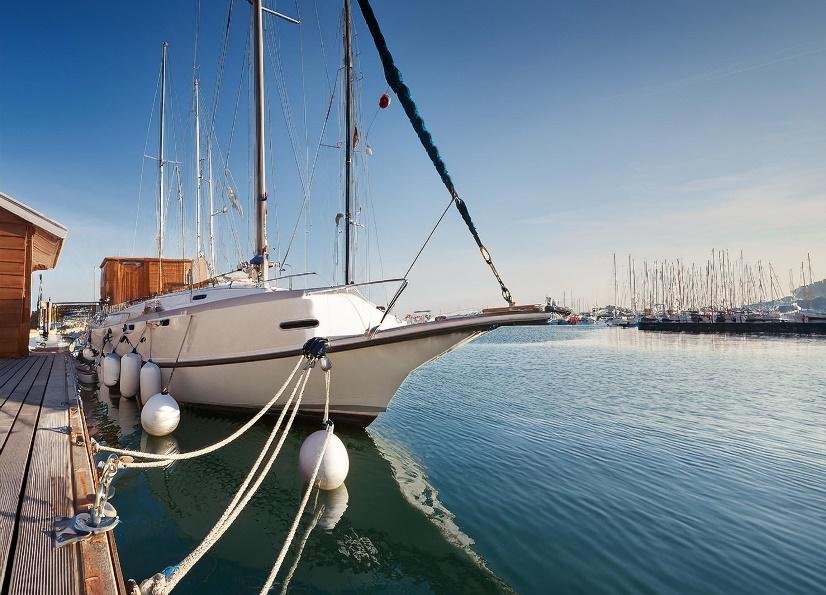
Image showing a boat docked alongside a pier with properly spaced and secured fenders
Rafting Up And Securing Both Boats
Rafting up with other boats is a common practice, especially in social settings. But it requires careful fender placement to protect both your boat and the neighboring boat.
Here’s how to do it right:
- Double Up: When rafting up, it’s a good idea to use more fenders than usual. Place them where the two boats will make contact, ensuring there’s plenty of cushioning between them.
- Stagger the Fenders: If possible, stagger the fenders so that they’re not all in a straight line. This creates better coverage and protection across the length of both boats.
- Secure from Both Sides: Make sure both boats have their fenders secured, not just one. This way, the fenders will stay in place even if the boats move slightly.
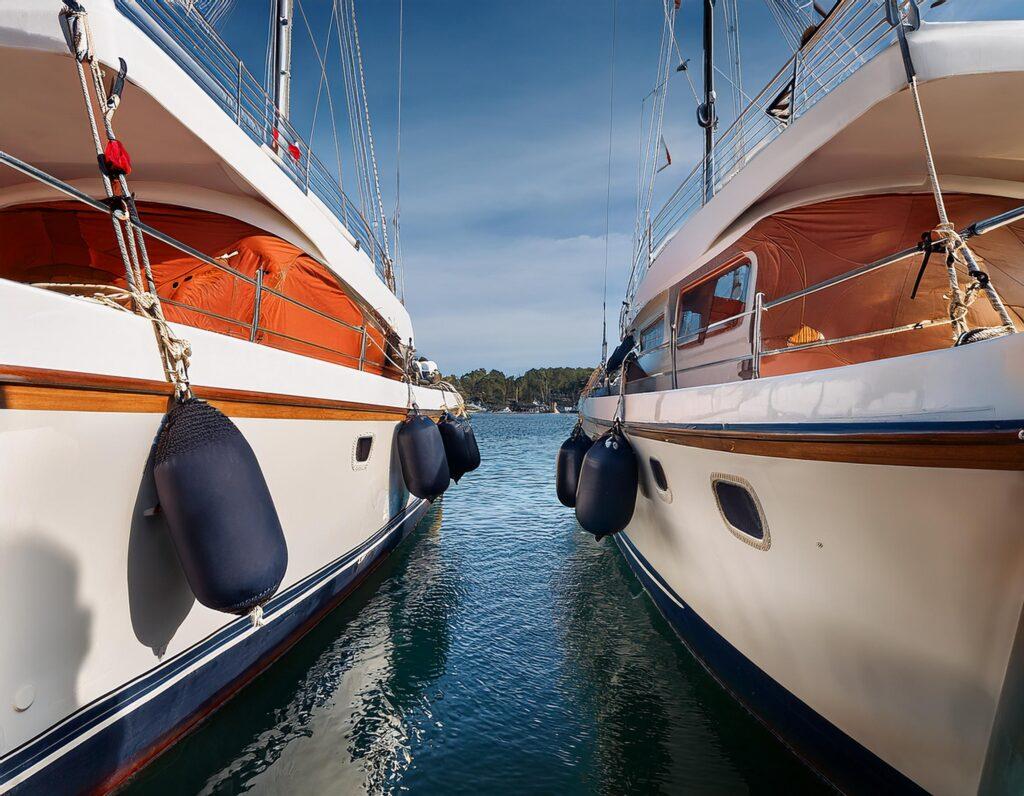
Image showing two boats rafted up with fenders properly placed between them.
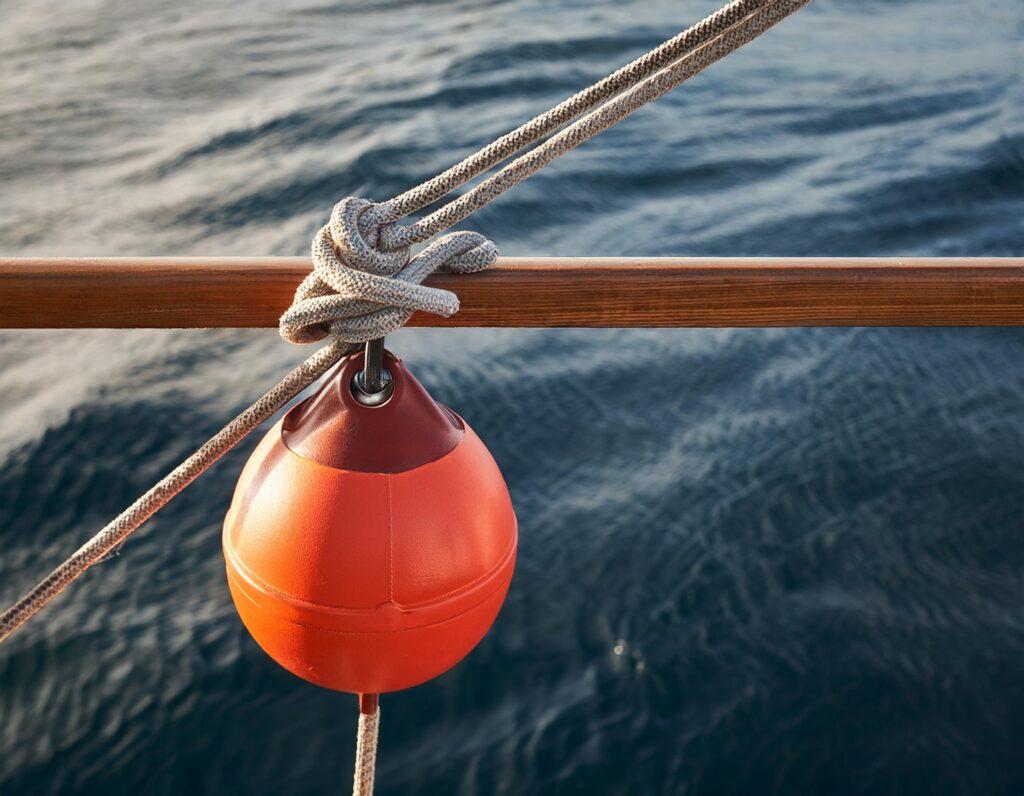
Securing Fenders to Railings When Cleats Are Not an Option
Sometimes, you might need to secure your fenders to a railing or another part of the boat where cleats aren’t available. In these cases, knowing how to tie fenders to railings is essential.
Here’s how:
- Use the Clove Hitch: The clove hitch is a great knot for tying fenders to railings. It’s quick to tie and holds securely enough for most situations. Simply wrap the line around the railing twice and tuck it under itself to secure.
- Check for Movement: Railings can sometimes allow fenders to move more than cleats do. Make sure to check that your fender is staying in place and adjust if necessary.
Don’t Miss These Pro Tips:
You’ve got your fenders, you know how to tie them, and you’re ready to protect your boat in any docking situation. But before you set sail, there are a few more tips and best practices that can help you make the most of your fenders.
From choosing the right fender lines to keeping your fenders in top shape, these extra steps can save you time, money, and headaches down the line.
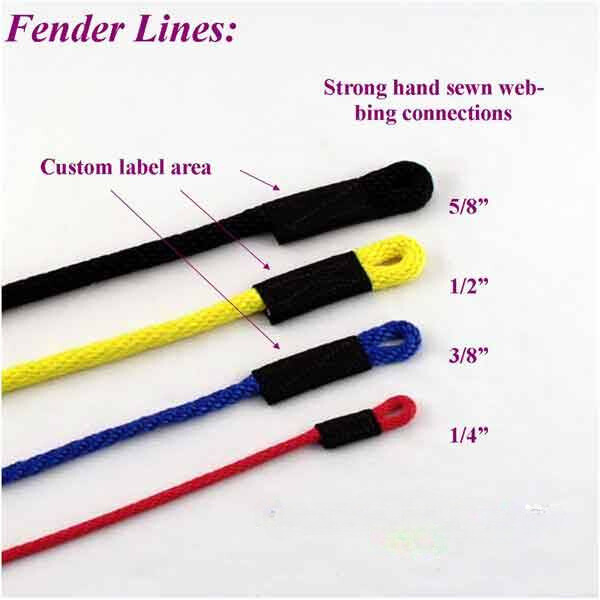
Choosing the Right Fender Line Matters More Than You Realize
The line you use to secure your fenders is just as important as the fenders themselves. A weak or inappropriate line can cause your fenders to slip or fail, leaving your boat vulnerable.
Here’s what to look for:
- Material Matters: Choose a line made from durable, weather-resistant material like nylon. Nylon is strong, flexible, and can withstand the harsh conditions of saltwater and sun exposure.
- Right Length: The length of your fender line should be long enough to tie securely but not so long that it gets tangled or in the way. Generally, 6 to 10 feet of line is sufficient, depending on your boat’s size.
- Diameter: The diameter of the line should be thick enough to hold your fender securely, typically 3/8 to 1/2 inch for most boats. Thicker lines are better for larger boats or in rough conditions.
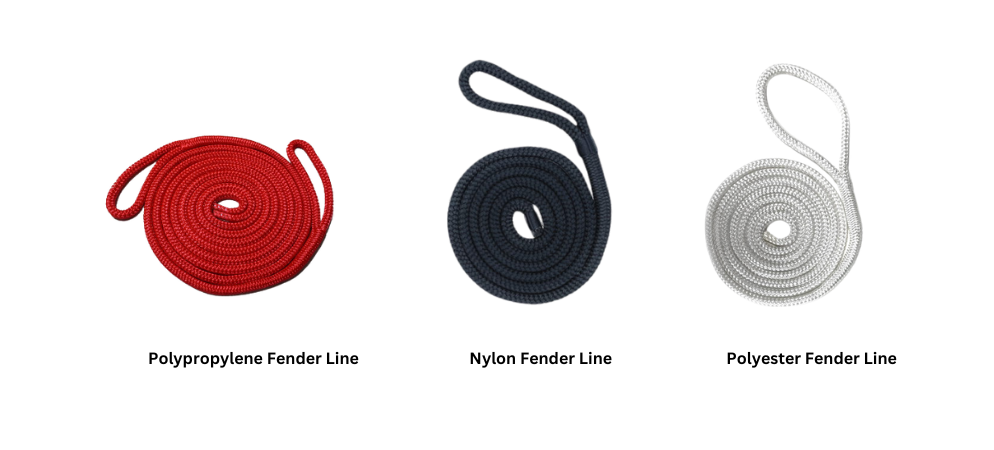
Material
- Nylon: Durable and stretches to absorb shock.
- Polypropylene: Affordable but less durable than nylon.
- Polyester: High strength and minimal stretch.
Common Fender Mistakes to Avoid:
Even experienced boaters can make mistakes when tying fenders, potentially compromising your boat’s protection:
- Using Too Few Fenders: It’s better to have too many fenders than too few. Make sure you have enough fenders to cover the length of your boat, especially in rough conditions.
- Incorrect Placement: Placing fenders too high or too low can render them useless. Always adjust the height based on the dock’s height and your boat’s position.
- Neglecting Regular Checks: Fenders can move or become loose over time, especially in changing conditions. Regularly check and adjust your fenders to ensure they’re still in the right position.
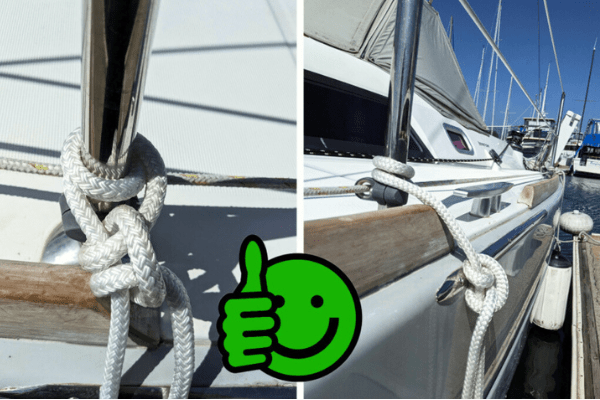
A clear visual example of what to do and what to avoid.
Conclusion
By following these additional tips and best practices, you’ll ensure that your fenders not only protect your boat effectively but also last as long as possible. With the right lines, proper maintenance, and careful placement, your boat will be well-equipped to handle any docking situation.
In the final section, we’ll recap everything you’ve learned and encourage you to put these techniques into practice. Let’s finish strong and keep your boat safe, secure, and looking great!
Don’t forget to practice these knots and techniques before your next trip. Share this guide with your fellow boaters and discuss your experiences or any challenges you’ve faced with fender placement.
Frequently Asked Questions
Here are FAQs based on the article, ensuring they address the most common queries boaters might have:
Q1: Where should I place fenders on my boat?
A1: Place fenders where your boat is most likely to make contact with the dock or other boats. Typically, this means spacing them evenly along the side, about 6 to 8 feet apart. Adjust the height of each fender based on the dock’s height or the proximity of other boats.
Q2: How high should fenders be on a boat?
A2: The height of your fenders should match the height of the dock or the surface your boat will be touching. For high docks, hang the fenders lower to cover the point of contact. For lower docks, raise the fenders accordingly. Always ensure they are placed to absorb impact effectively.
Q3: How many fenders do I need for my boat?
A3: A good rule of thumb is to have at least one fender for every 10 feet of boat length, with a minimum of three fenders. However, if you’re in rough conditions or rafting up, it’s better to use more fenders to provide ample protection.
Q4: What kind of rope should I use for boat fenders?
A4: Nylon rope is ideal for boat fenders because it is durable, flexible, and resistant to the harsh conditions of saltwater and sun exposure. A line with a diameter of 3/8 to 1/2 inch is typically sufficient for most boats, depending on size and docking conditions.
Q5: How do I tie fenders when rafting up?
A5: When rafting up, place fenders where the two boats will make contact. Use extra fenders for added protection, and stagger them to cover more surface area. Make sure both boats have fenders secured to keep them in place even if the boats move slightly.
Q6: How do I tie a fender to a railing?
A8: To tie a fender to a railing, use the clove hitch knot. Wrap the line around the railing twice, then tuck the end under itself to secure. This knot is quick and holds well, but check for movement as railings can allow more slippage than cleats.
Q6: How should I store my boat fenders?
A9: Store your fenders in a cool, dry place, away from direct sunlight. This prevents the material from weakening and extends the life of the fenders. Consider using fender racks or bags designed specifically for storage to keep them organized and protected.
Q7: Can I leave my fenders out all the time, or should I remove them after docking?
A7: It’s generally a good idea to remove your fenders after docking, especially if you’re going to be underway for a while. Leaving them out can cause unnecessary wear and tear and may even get in the way during navigation. Storing them properly when not in use helps prolong their lifespan.