Do you wanna know how to fix rusted out Fenders? Imagine walking up to your vehicle one morning, coffee in hand, only to notice those nasty orange patches on your fenders. Yep, rust.
In fact it’s like the vehicle’s version of wrinkles, only worse because it doesn’t just look bad, it actually eats away at the metal. Rusted out fenders aren’t just a cosmetic issue, they can seriously affect your vehicle’s value and safety. Ignoring them is like letting a small leak in your roof go unattended, it’s only going to get worse.

1. Fixing Rusted Out Fenders is Crucial
Rust is sneaky. What starts as a little spot can quickly spread, eating away at the metal and making the fender weak and fragile. And it doesn’t stop there. Therefore if rust isn’t dealt with early, it can spread to other parts of your vehicle, leading to even more expensive repairs.
Plus, a rusted fender is a sure way to kill your vehicle’s resale value. No one wants to buy a rust bucket, right? Thus, fixing rusted fenders isn’t just about looks; it’s about protecting your investment and keeping your vehicle safe on the road.
2. Rust and Its Impact on Fenders
Whether you are dealing with a few small rust spots or a full-blown rust problem, I’ve got you covered. You will learn how to stop rust in its tracks and restore your fenders to their former glory.
We will walk through the process step by step, so even if you are a total beginner, you’ll be able to follow along. By the end of this blog, you’ll know exactly what to do to fix those rusted fenders and keep your vehicle looking sharp.
1.The Factors Causing Fender Rust
Rust is like a bad guest at a party, it shows up uninvited and just won’t leave. But what actually causes rust to form on your vehicle’s fenders? It all comes down to a few key factors: moisture, oxygen, and time.
When metal fenders are exposed to water (think rain, snow, or even just humid air), the water reacts with the iron in the metal to form iron oxide, better known as rust. Add a bit of salt to the mix (like the stuff they use on roads in winter), and the rusting process speeds up even more. That is why vehicles in coastal areas or places with harsh winters tend to rust faster.
2. How Rust Affects Your Vehicle
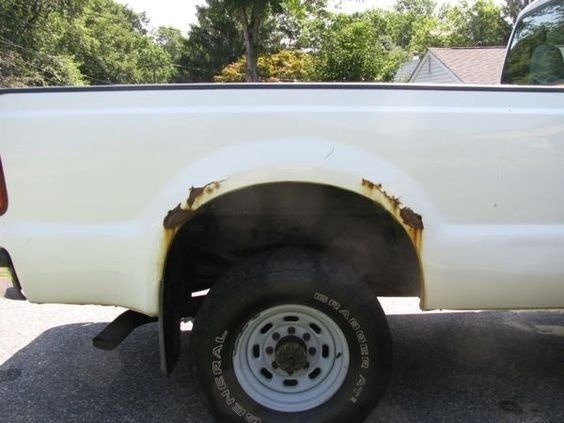
Rust might start as just an annoying orange stain, but it doesn’t stop there. If left untreated, rust will eat away at the metal, making it thin and brittle. Over time, this can lead to holes in your fenders, which are not only unsightly but also unsafe. Rust weakens the structural integrity of the fender, making it more prone to damage in a collision. And let’s not forget about the resale value, no one wants to buy a vehicle with rusted out fenders. So, dealing with rust early on isn’t just about keeping your vehicle looking good; it’s about keeping it safe and valuable.

3. Identifying Different Types of Rust
Not all rust is created equal. Before you start fixing those rusted fenders, it’s important to know what kind of rust you’re dealing with. Here are the three main types:
Surface Rust– This is the most common type of rust and the easiest to fix. It’s usually just on the surface of the metal and hasn’t eaten through yet. You’ll notice small, orange spots on the paint. This kind of rust can be sanded down and treated relatively easily.
Scale Rust– If surface rust is left untreated, it can turn into scale rust. This type of rust eats deeper into the metal, creating rough, flaky patches. You’ll need to use a rust converter to stop it from spreading further before you can repair it.
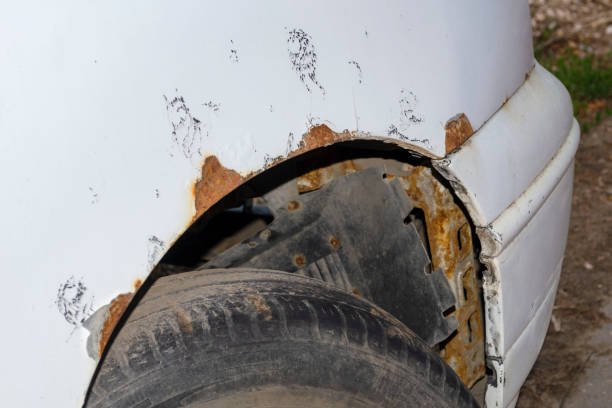
Penetrating Rust– This is the worst kind of rust, where the metal has been eaten through completely, leaving holes in the fender. Fixing penetrating rust usually requires patching the holes or even replacing parts of the fender.
Knowing what type of rust you’re dealing with will help you choose the right approach to fix it. If it’s just surface rust, it’s a quick fix. But if it’s scale or penetrating rust, you will need to roll up your sleeves and put in a bit more work.
3. Preparation Before Fixing Rusted Fenders
Before fixing those rusted fenders, it’s crucial to have all the right tools and materials on hand.
1- Necessary Tools and Materials
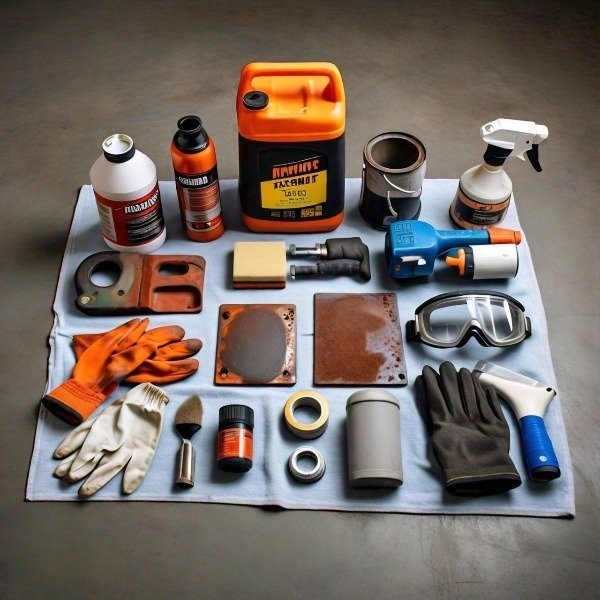
Trust me, there is nothing worse than getting halfway through a job only to realize you’re missing something important. Here’s a quick list of tools and material that you will need:
Rust Remover-You’ll need this to get rid of the rust before you start any repairs.
Sandpaper– Make sure to have a variety of grits, starting with coarse (around 80-grit) and moving to finer (up to 320-grit) for smoothing out the surface.
Rust Converter– This is key for dealing with any scale rust. It turns rust into a paintable surface.
Filler or Patch Kit– For those deeper rust spots or holes, you’ll need a filler or a patch kit to restore the metal.
Primer– A good quality primer will help the paint adhere better and last longer.
Paint– Match the color to your car to ensure the repair blends seamlessly.
Protective Gear– Don’t forget safety! Gloves, a mask, and safety glasses are a must when working with rust and chemicals.
Having these materials ready will save you time and make the whole process smoother.
2- Safety Precautions
Now, I know you’re eager to get started, but let’s talk safety first. Working with rust, chemicals, and sharp tools can be dangerous if you are not careful. Here are a few tips to keep you safe:
Wear Gloves– Rust can be sharp, and some chemicals can irritate your skin. Gloves will protect your hands from cuts and exposure.
Use a Mask– Sanding rust creates dust that you don’t want to breathe in. A mask will help keep your lungs safe.
Protect Your Eyes– Safety glasses are a must to shield your eyes from flying debris when sanding or using tools.
Work in a Well-Ventilated Area– Some of the chemicals you’ll be using, like rust remover and primer, can give off fumes. Make sure you’re working in a space with good airflow to avoid inhaling anything harmful.
By taking these simple precautions, you’ll keep yourself safe while you work on fixing your rusted fenders.

3- Assessing the Rust Damage
Before you jump into repairs, it’s important to assess the extent of the rust damage. As you know that not all rust is created equal, by categorizing it in three types and knowing how bad the situation is, will help you decide the best approach.
4. Methods to Fixing Rusted Out Fenders
Take a good look at your fenders and decide which type of rust you are dealing with. This will guide your next steps and ensure you’re using the right methods and materials.
Step 1- Removing Surface Rust
Let’s get started with the actual repair! If you are dealing with surface rust, you are lucky it’s the easiest to handle. Here is how to do it!
1. Start by cleaning the area with soapy water to remove any dirt and debris. Dry it thoroughly.
2. Apply the rust remover to the affected area. Let it sit according to the product instructions—usually about 10-15 minutes.
3. Once the rust remover has done its job, use coarse sandpaper (80-grit) to sand away the rust. Keep sanding until you reach clean, shiny metal.
4.Switch to finer sandpaper (320-grit) to smooth out the surface, preparing it for primer and paint.
By the end of this step, your fender should be free of surface rust and ready for the next stage of repair.
Step 2- Patching Rust Holes
If your fender has rust holes, don’t worry—there’s a fix for that too. Here’s how to patch them up:
1.Clean the area around the hole thoroughly. Remove any loose rust and debris.
2. Apply a rust converter to the edges of the hole to stop any remaining rust from spreading.
3. If the hole is small, you can use a metal filler to patch it. Apply the filler with a putty knife, smoothing it out evenly. Let it dry completely.
4. For larger holes, use a patch kit. Cut the patch to size and apply it over the hole, following the kit’s instructions.
5. Once the filler or patch is dry, sand it down with fine sandpaper (320-grit) until the surface is smooth and even.
Your fender should now be free of rust holes and ready for priming and painting.
Step 3- Treating the Rusted Area
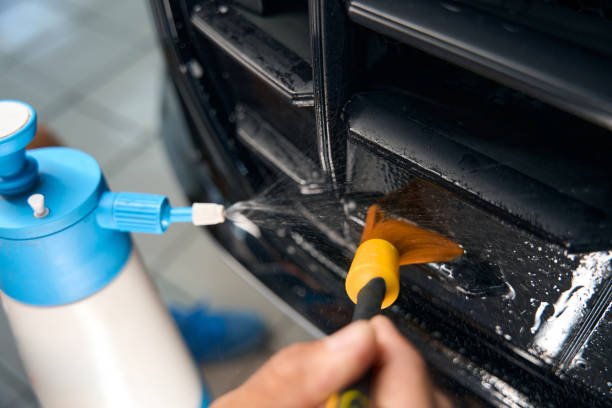
To ensure the rust doesn’t come back, you need to treat the area before painting. Here is how
1. Apply a rust converter to the entire area you’ve sanded. This will chemically neutralize any remaining rust and create a surface that’s ready for primer.
2. Let the rust converter dry completely. It usually takes about 24 hours to fully cure.
This step is crucial in preventing future rust and ensuring your repair lasts.
Step 4- Priming the Area
Priming is the key to a good paint job. It helps the paint adhere better and protects the metal from future rust. Here’s how to prime your fender:
1. Shake the primer can well and spray a light, even coat over the entire repaired area.
2. Let the primer dry according to the product instructions—usually about 30 minutes to an hour.
3. Apply a second coat if needed to ensure full coverage.
Your fender is now prepped and ready for the final step—painting.
Step 5- Painting and Finishing
Now for the fun part, making your fender look brand new again! Here’s how to paint and finish your repair
1. Choose a paint that matches your vehicle’s color. Shake the can well.
2. Spray a light, even coat of paint over the primed area. Keep the can about 12 inches away to avoid drips.
3. Let the paint dry for about 30 minutes, then apply a second coat for full coverage.
4.Once the paint is dry, apply a clear coat to protect the finish and add shine. Your fender should now look as good as new.

Step 6- Final Inspection and Touch-Ups
Finally, take a close look at your work. If you notice any spots that need attention, now’s the time to fix them:
1. Check for any rough spots or areas where the paint didn’t fully cover. Sand lightly and apply more paint if needed.
2. Buff the entire area to blend the new paint with the old, ensuring a seamless finish.
Your rusted fender is now completely repaired, and your vehicle looks great again!
5. Preventing Fenders From Rust in Future
In order to prevent fenders from rust we must remember these points.
1- Regular Maintenance Tips
Fixing rusted fenders is one thing, but keeping them rust-free is another. The good news is that with some simple maintenance, you can keep your car looking great and avoid future rust issues. Here’s how:
Wash Your Vehicle Regularly
Dirt, grime, and especially salt can speed up the rusting process. By washing your vehicle regularly, especially the fenders, you can remove these harmful substances before they cause damage. Pay extra attention during winter if you live in an area where roads are salted.
Dry Your Vehicle After Washing
Water is the enemy when it comes to rust. After washing your vehicle, dry it thoroughly, paying close attention to the fenders and any other areas prone to rust. This will prevent water from sitting on the surface and starting the rusting process.
Apply Wax
Waxing your vehicle is not just about making it shine, it also adds a protective layer that can help prevent rust. Aim to wax your vehicle every few months, focusing on the fenders.
Check for Rust Regularly
It’s easier to deal with rust when it’s just starting out. Regularly inspect your fenders for any signs of rust, like small orange spots or bubbling paint. Catching rust early can save you a lot of time and effort down the road.
2- Using Rust Prevention Products
If you want to go the extra mile in protecting your fenders, consider using rust prevention products. These are specially designed to keep rust at bay and extend the life of your car’s fenders:
Rust Inhibitors– These are sprays or treatments that you can apply to the fenders. They create a barrier that prevents moisture from reaching the metal, which is key to stopping rust before it starts.
Undercoating– Applying an undercoating to the underside of your car can protect it from road salt, water, and debris. This is especially useful if you live in a place with harsh winters.
Rust-Proofing Sprays– These sprays are designed to be applied to specific areas prone to rust, like the edges of fenders and wheel wells. They’re easy to use and provide an added layer of protection.
Using these products as part of your regular car maintenance routine can significantly reduce the risk of rust forming on your fenders.
3- Avoiding Common Rust Triggers
Some environments and conditions make your vehicle more prone to rust. Here’s how to avoid those common rust triggers:
Stay Away from Salt– Road salt is a major rust accelerator. If you can, avoid driving in salty conditions. If you can’t avoid it, be sure to wash your vehicle soon after to remove the salt.
Keep Your Car Dry– Water is a major factor in rust formation. If possible, park your vehicle in a garage or under a cover to keep it dry, especially during rainy or snowy weather.
Repair Chips and Scratches Promptly– Any damage to your vehicle’s paint can expose the metal underneath, making it vulnerable to rust. Fix chips and scratches as soon as you notice them to keep rust at bay.
By being mindful of these rust triggers, you can extend the life of your fenders and keep your vehicle looking great for years to come.
6. DIY vs. Professional Rust Repair
You have already seen how to fix rusted fenders yourself, but how do you know when to DIY and when to seek professional help? Here’s a quick guide.
1- When to DIY
Small Rust Spots– If you’re dealing with minor surface rust, DIY is the way to go. As long as you have the right tools and follow the steps we’ve outlined, you can easily handle small rust spots at home.
Fender Edge Rust– Rust around the edges of fenders can often be fixed with some sanding, priming, and painting. This is another situation where DIY is practical and cost-effective.
Non-Structural Rust– If the rust hasn’t compromised the structural integrity of the fender, you can likely fix it yourself with the right materials and a bit of elbow grease.
DIY rust repair is great for those who enjoy working on their vehicles and want to save money. Plus, there is a certain satisfaction in knowing you fixed the problem yourself.
2- When to Seek Professional Help
Sometimes, though, the rust damage might be beyond what you can handle in your garage. Here’s when you should consider calling in a professional:
Severe Rust Damage– If the rust has eaten through the fender or has spread to multiple areas, it’s best to seek professional help. Professionals have the tools and expertise to repair or replace severely rusted fenders.
Rust on Structural Parts– If the rust affects parts of the vehicle that are crucial for safety, like the frame or suspension, don’t try to fix it yourself. Structural rust repair is complicated and requires specialized skills.
Lack of Time or Tools– Rust repair can be time-consuming, and if you don’t have the necessary tools or space to do the job properly, a professional can save you a lot of hassle.
Getting a professional to handle severe rust issues ensures the job is done right and can save you money in the long run by preventing further damage.
3- Cost Comparison
When deciding whether to DIY or hire a professional, cost is often a big factor. Here is a quick comparison:
DIY Costs– For minor rust repair, you’ll be looking at the cost of materials—rust remover, sandpaper, primer, paint, and possibly a filler or patch kit. This usually adds up to between $50 and $100, depending on the size of the area and the quality of the products you use.
Professional Costs– Professional rust repair costs can vary widely depending on the extent of the damage. For minor rust, you might pay around $200-$500. For more extensive damage, especially if it requires replacing parts of the fender, the cost can run into the thousands.
While DIY is cheaper, it’s important to weigh the cost against the time and effort required, as well as the risk of not fixing the problem correctly.
Click here to check best converter and primer
7. Recap of Key Points
Fixing rusted fenders might have seemed challenging at first, but by now, you should feel much more confident about tackling this common issue. We started by understanding why rust is a serious problem, not just an eyesore but a potential safety hazard and learnt the different types of rust, from surface rust to the more severe penetrating rust, and walked through the entire process of fixing rusted fenders, from assessing the damage to the final touches of painting and inspection.
We also covered the importance of preventing future rust. Regular maintenance, like washing and waxing your vehicle, and using rust prevention products, can go a long way in keeping your fenders rust-free. And when it comes to deciding between DIY and professional repairs, you now have a clear understanding of when you can handle it yourself and when it’s better to call in the experts.
Time to take action
Now that you have got all the know-how, it is time to take action. Don’t let rust get the better of your vehicle. Whether you are dealing with a few small rust spots or a more serious issue, you now have the tools and knowledge to fix it. Remember, the sooner you tackle rust, the easier it is to manage. So, grab your tools, set aside some time, and get those fenders looking good as new.
And if you have been putting off rust repairs because you were not sure where to start, hopefully, this guide has given you the confidence to dive in. Your vehicle and your wallet will thank you for it in the long run.
If you found this guide helpful, why not share your experience? I would love to hear how your rust repair project turned out. Drop a comment below, share your tips, or ask any questions you might still have. And if you want more DIY car repair tips, be sure to subscribe to our blog. We Are all about helping you keep your car in top shape, without breaking the bank.
FAQs
1. How do I know if my fender rust is serious?
If the rust is just on the surface, you’ll notice small orange spots or bubbling paint. This is usually easy to fix. But if you see rough, flaky patches or holes in the metal, the rust is more serious and may require more extensive repairs.
2. How can I prevent my fenders from rusting again?
Regularly wash and wax your car, especially during winter when road salt is common. You can also use rust prevention products like rust inhibitors or undercoating to protect your fenders from moisture and salt.
3. How long does it take to fix rusted fenders?
The time it takes to fix rusted fenders depends on the severity of the rust. Minor surface rust can be fixed in a few hours, while more extensive repairs might take a day or two, especially if you need to let products like rust converters and primers dry between steps.
4. Can I paint over rust on my fender?
No, it’s important to remove the rust first. Painting over rust will only trap moisture and make the problem worse over time. Make sure to remove all the rust, treat the area, and prime it before applying paint.
5. How often should I check my car for rust?
It’s a good idea to check your car for rust every few months, especially after winter or if you’ve been driving in salty or humid conditions. Early detection is key to preventing serious rust damage.