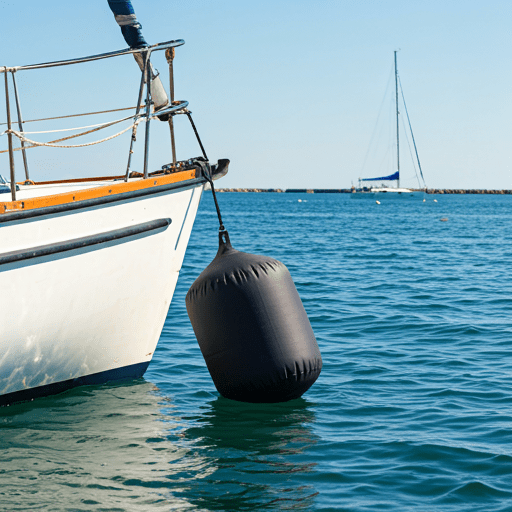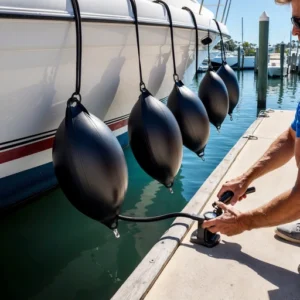
How to tie center hole boat fenders is simple if you follow these steps:
- Prepare the Line: Use a length of rope that suits the size of your fender.
- Pass Through the Fender: Thread the rope through the center hole of the fender.
- Secure to the Rail: Tie the rope around your boat’s rail using a half-hitch knot or a clove hitch.
- Adjust Height: Make sure the fender hangs just above the waterline.
- Secure the Loose End: Tie off the loose end of the rope to keep everything in place.
This setup ensures your boat is well-protected while docked.
Now, I’m going to walk you through everything you need to know about how to tie a center hole boat fenders in detail. Ready to dive in? Let’s go!
Why Center Hole Fenders?
So, what’s the big deal about center hole fenders? Well, they’re not just another piece of boating gear.
These fenders are specifically designed to give your boat some serious protection. Here’s why they’re so popular:
1. Easy Installation
Center hole fenders are super easy to install. Unlike some other types of fenders that require complicated setups, these just need a rope threaded through the center hole.
Once that’s done, you can secure them to your boat in a flash.
2. Great Protection
When you’re docking, your boat’s hull is at risk of getting scratched or worse, dented.
Center hole fenders act like cushions between your boat and the dock, absorbing the impact and keeping your boat’s sides looking pristine.
3. Versatile Use
Whether you’ve got a small fishing boat or a larger yacht, center hole fenders work for all sizes.
They come in various sizes and can be adjusted easily, making them versatile for different docking situations.
4. Easy Adjustment
One of the coolest things about these fenders is how easy they are to adjust. You can move them up or down to get the perfect position, ensuring maximum protection for your boat.
Whether the water is calm or choppy, you can trust that your fenders are doing their job.
5. Durability
Made from tough materials, center hole fenders are built to last. They’re designed to withstand harsh marine environments, so you won’t need to replace them anytime soon.
Using these fenders isn’t just about keeping your boat safe; it’s also about peace of mind. You’ll know that when you dock, your boat is well-protected, and that’s a great feeling.
Essential Tools and Materials
Don’t worry, you won’t need a ton of stuff, but having the right gear makes the job a lot easier.
1. The Right Rope
You’ll need a sturdy, marine-grade rope. This isn’t the time to skimp on quality—your boat’s safety depends on it! Go for a rope that’s strong enough to hold up against the elements but flexible enough to tie securely.
Look for ropes made from nylon or polypropylene, as they’re durable and resist wear and tear from the water.
2. Center Hole Boat Fenders
Fenders come in various sizes, so pick ones that suit the size of your boat.
If you have a smaller boat, you might only need one or two fenders, but larger boats will need more to cover the entire length.
3. Cleats or Rails
You’ll be securing your fenders to something on your boat, usually cleats or rails. Make sure these are in good condition and can handle the tension from the rope.
It’s a good idea to check them periodically to ensure they’re secure and not corroding.
4. Knife or Scissors
You might need a knife or pair of scissors to trim any excess rope after tying your fenders.
Keep them handy, but be careful—always cut away from yourself!
5. Gloves (Optional)
If you’re going to be tying and adjusting fenders frequently, a pair of gloves can protect your hands from rope burn. It’s not a must, but it can make the process more comfortable.
Having these tools and materials ready will make the process of tying your fenders smoother and faster. Plus, using quality gear means you’ll get better protection for your boat.
Tying Center Hole Boat Fenders
Now, let’s get into the nitty-gritty—actually tying those fenders. I’ll take you through each step, so you’ll have your boat protected in no time.
Step 1: Choose the Right Fender
First things first—make sure you’ve got the right fender for your boat. If your boat’s on the larger side, go for bigger fenders.
They’ll provide better protection against docks and other boats. Smaller boats can get away with smaller fenders, but make sure they’re still large enough to do the job.
Step 2: Thread the Rope
Once you’ve got your fender, it’s time to thread the rope. Take one end of your marine-grade rope and push it through the center hole of the fender.
Pull it through until you’ve got enough length on both sides to secure it to your boat.
Step 3: Secure the Fender to the Boat
Now that the rope is through the fender, you’ll want to secure it to your boat. Find a strong point on your boat, like a cleat or rail, and wrap the rope around it.
Make sure it’s in a spot where the fender can hang freely without obstruction.
Step 4: Tie the Knot
This is where the magic happens. You’ll want to tie a secure knot, like a clove hitch or half hitch, to keep the fender in place.
The clove hitch is a favorite among boaters because it’s easy to tie and holds up well. If you’re new to tying knots, don’t worry—it gets easier with practice!
To tie a clove hitch knot:
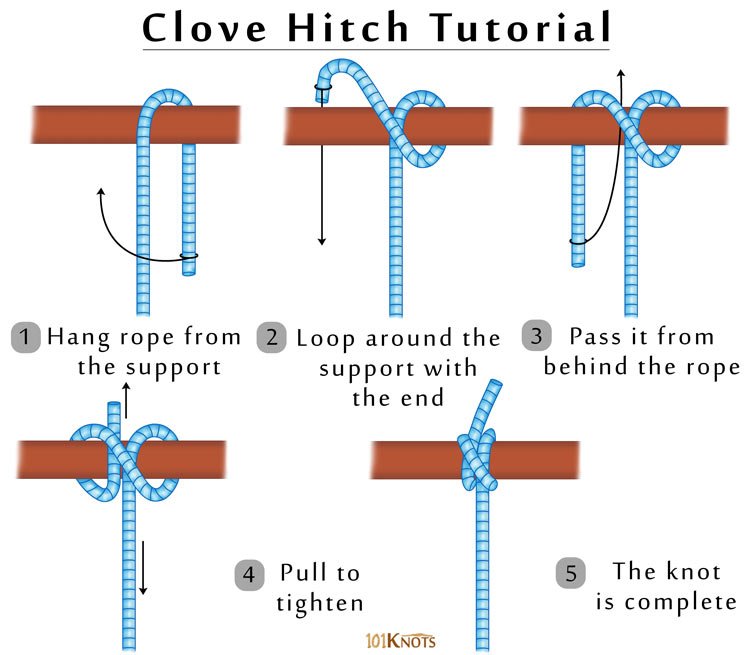
- Wrap the Rope: Start by wrapping the rope around the object (e.g., a post or rail).
- Make a Second Wrap: Wrap the rope around the object again, crossing over the first wrap.
- Tuck the End: Tuck the loose end of the rope under the last wrap you made.
- Tighten: Pull both ends of the rope to tighten the knot.
The clove hitch is easy to tie and adjust, making it great for securing boat fenders.
To tie a half hitch:
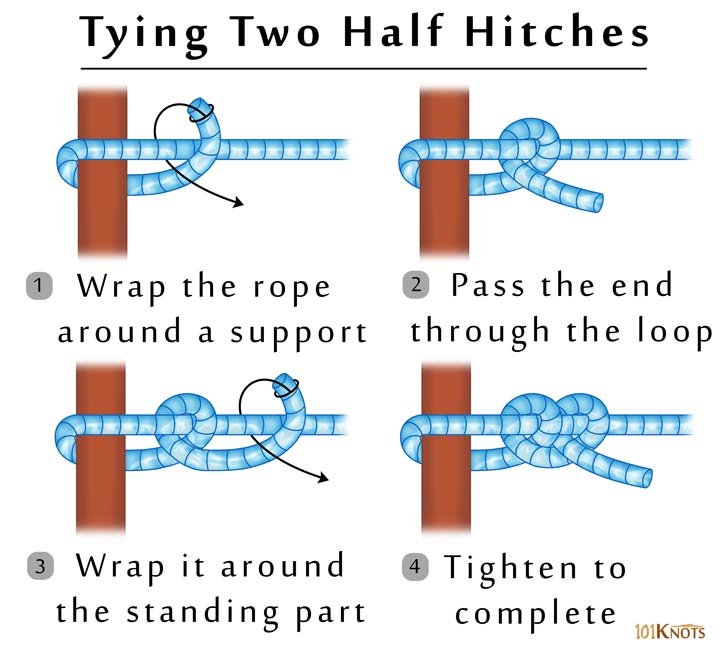
- Start with the Rope: Pass the working end of the rope around an object (like a post or rail).
- Loop Around: Bring the working end back over and around the standing part of the rope.
- Tuck Under: Tuck the working end under the loop you just created.
- Tighten: Pull both the working end and the standing part of the rope to tighten the knot.
A half hitch is simple and often used as part of other knots, like a clove hitch.
Step 5: Adjust the Height
After you’ve tied the knot, check the height of the fender. It should hang just above the waterline when your boat is docked.
If it’s too high or too low, adjust the rope until it’s in the right position. Remember, the goal is to protect your boat’s hull, so make sure the fender is positioned to absorb any impacts.
Step 6: Final Check
Give the fender a little tug to make sure it’s secure. You don’t want it slipping out of place when you dock! If everything feels solid, you’re good to go.
And there you have it—your boat’s now protected with properly tied center hole fenders. It’s a simple process, but one that can save you a lot of headaches down the line.
Plus, with the right knots and adjustments, your boat will be ready to handle whatever the dock throws at it.
Best Practices for Using Center Hole Fenders
Alright, so you’ve got your center hole boat fenders tied up and ready to go. It’s essential to follow some best practices.
These tips will help you get the most out of your fenders and ensure your boat stays in great shape.
1. Regularly Inspect Your Fenders
Even the most durable fenders can wear out over time, especially if you’re docking frequently. Make it a habit to check your fenders regularly.
Look for any signs of wear, such as cracks, fading, or thinning of the material. If you notice any damage, it’s time to replace them. Remember, a worn-out fender won’t protect your boat as effectively.
2. Keep Your Ropes in Good Condition
Your ropes are just as important as the fenders themselves. If the rope is fraying or weakening, it could snap, leaving your boat unprotected. Inspect the ropes for any signs of wear and replace them if necessary.
A good rule of thumb is to replace the ropes every season or if they show any significant damage.
3. Adjust Fenders Based on Docking Conditions
Not all docks are the same. Depending on where you’re docking, you may need to adjust the height or position of your fenders.
For instance, if you’re docking at a higher pier, you might need to raise the fenders a bit.
Conversely, if you’re docking in a low-lying marina, lowering the fenders could be necessary. Always check the docking situation and adjust your fenders accordingly.
4. Clean Your Fenders Regularly
Over time, fenders can get pretty dirty from rubbing against docks and other boats.
Keep them clean to maintain their durability and effectiveness.
A simple wash with soap and water should do the trick.
For stubborn stains, a little marine cleaner can go a long way.
5. Use Multiple Fenders for Larger Boats
If you have a larger boat, relying on just one or two fenders isn’t going to cut it.
Spread out multiple fenders along the side of your boat to ensure even protection.
The general rule is to use one fender for every 10 feet of boat length, but you can add more if you feel it’s necessary.
6. Store Fenders Properly When Not in Use
When you’re not using your fenders, store them properly to prolong their lifespan.
Keep them in a dry, cool place out of direct sunlight to prevent unnecessary wear.
Proper storage helps keep them in top shape for the next time you need them.
Common Mistakes to Avoid
Even seasoned boaters can make mistakes when it comes to tying and using fenders. Here are some common pitfalls to watch out for, so you can avoid them and keep your boat safe.
1. Tying Knots Too Loosely
One of the biggest mistakes is tying the fender knots too loosely. A loose knot can slip, causing the fender to drop or shift out of place.
This leaves your boat’s hull exposed to potential damage. Always double-check that your knots are tight and secure.
2. Placing Fenders Too High or Too Low
Another common error is positioning the fenders at the wrong height. If the fender is too high, it won’t protect the boat when docking.
If it’s too low, it might dip into the water and lose its effectiveness. The fender should be placed just above the waterline to cushion the boat properly.
3. Using the Wrong Type of Rope
Using a non-marine grade rope can be a costly mistake. Regular ropes can degrade quickly in a marine environment, leading to breakage when you need them most.
Stick to ropes designed specifically for boating—they’re built to withstand water, salt, and the sun.
4. Not Using Enough Fenders
If you think one or two fenders will do the trick for your boat, think again.
Using too few fenders leaves parts of your boat unprotected, especially if you’re dealing with strong winds or choppy water.
Make sure you have enough fenders to cover the entire side of your boat.
5. Ignoring Wear and Tear
Fenders and ropes don’t last forever. Ignoring signs of wear can lead to failures at the worst possible times.
Make regular inspections a part of your boating routine to catch any issues before they become a problem.
Best Tips for Seasoned Boaters
Following tips will keep your boat protected and your fenders doing their job effectively.
1. Experiment with Different Knots
If you’re comfortable with the basic knots like the clove hitch, why not experiment with others? Knots like the figure-eight or the round turn with two half hitches offer extra security, especially in rough conditions.
These knots might take a bit more practice, but they can provide a tighter hold, which is crucial when the weather turns.
2. Consider Fender Covers
Fender covers are an excellent investment if you’re docking frequently or in rough areas.
These covers protect your fenders from wear and tear, extending their lifespan.
They also reduce the chance of your fenders marking up your boat’s hull. Plus, they’re easy to clean—just toss them in the washing machine when they get dirty.
3. Double Up on Fenders in Rough Waters
If you know you’ll be docking in rough waters or during a storm, double up on your fenders.
Place them side by side or stagger them along the length of your boat for extra cushioning.
This added layer of protection can prevent your boat from getting banged up against the dock.
4. Use Fenders on Both Sides of the Boat
In some situations, especially when docking in a tight space or in a marina where boats are close together, you’ll want to use fenders on both sides of your boat.
This will prevent any accidental bumps with neighboring boats or the dock, ensuring your boat stays scratch-free.
5. Adapt to Different Docking Scenarios
Every docking situation is unique. Whether you’re docking alongside a pier, in a slip, or against another boat, be ready to adjust your fenders.
For example, when docking next to a pier, you might want to position your fenders lower, while docking alongside another boat may require higher placement to match the height of the other boat’s fenders.
These advanced tips will help you handle any docking challenge that comes your way, keeping your boat safe and your fenders working optimally.
Conclusion
Let’s quickly recap what we’ve covered:
- Understanding the Basics: Center hole fenders are essential for protecting your boat’s hull from damage. They’re easy to install, adjust, and offer great protection.
- Step-by-Step Tying Guide: We walked through the process of tying these fenders securely to your boat, ensuring they’re positioned perfectly for maximum protection.
- Best Practices: Regular inspection, adjusting fenders based on docking conditions, and using multiple fenders for larger boats are all key to keeping your boat safe.
- Common Mistakes: Avoid loose knots, incorrect fender placement, and using the wrong type of rope to ensure your fenders do their job.
- Advanced Tips: Experiment with different knots, use fender covers, double up in rough waters, and adapt to different docking scenarios to keep your boat in top shape.
Tying center hole boat fenders might seem like a small task, but it’s one that plays a big role in keeping your boat safe.
With the tips and techniques shared in this guide, you’re now equipped to handle your fenders like a pro. So, go ahead—dock with confidence, knowing your boat is well-protected.
And hey, if you found this guide helpful, why not share it with fellow boaters? Safe boating!
You might also like this article
Here you can also this article great experience.
How to Tie Center Hole Boat Fenders

